

We Relaunched Our Own Website — Here’s What Changed (And Why It Matters)
Chapter 1: Introduction to HubSpot workflows (and why they’re so important to lead generation)
At the beginning of your business, you have a website that is probably available to your customers, but not getting a lot of traffic. Over time you develop new strategies to get more leads coming into your website and develop your traffic.
But after a while, you start getting enough leads that you’re unable to manage most of the day-to-day activities you have as a business owner.
Nurturing leads takes time, and if you’re not keeping active updating leads to help push them through your sales funnel, proven or not, you will have a higher dropout rate.
Remember that inbound methodology requires that we attract, engage, and delight.
Or, you might have some tasks that are extremely repetitive that are keeping you away from spending time with your leads.
This is where workflows come in.
Workflows are marketing automation tools that help alleviate a lot of the work that you otherwise would do repetitively.
It may be easier than you map out the buyer’s journey first.
But for example, if you know that a normal trigger for a customer deciding to make a purchase is them downloading a piece of content, you may want to add a trigger in your workflow that when a contact downloads that certain piece of content, they become an MQL or marketing qualified lead.
From there, you may have them entering into different workflows that are specifically created to nurture that type of lead.
Workflows don’t stop just at just changing lead scoring within a contact’s profile. You can help automate almost all of your repetitive marketing tasks, from something very simple to very complex.
In Chapter 2, let’s get right down to business and start seeing what types of workflows you can build from a template.
Chapter 2: Types of Workflow Templates and Why they work
There are two different types of workflows that you can create in HubSpot. You can either create one from a template or if the workflow needs vary from what’s already available, one can be created from scratch.
Create a Workflow from a Template
For very specific and more simple tasking, creating a workflow from a template might be a little easier, as well as more practical.
The templates that HubSpot provides are plug-and-play, meaning that the pieces of the triggers are already pre-built, and all you will need to do is select what sort of action will cause what to trigger.
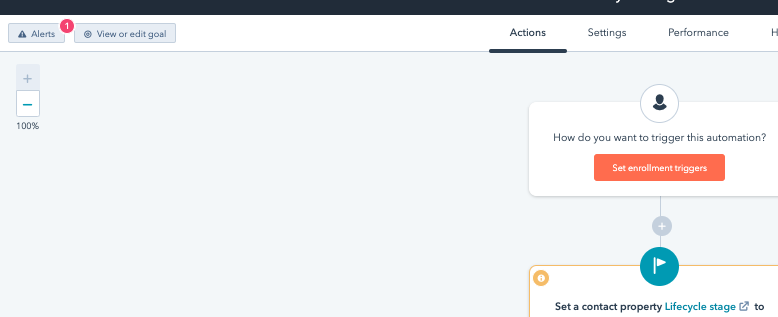
Let’s go to the first example, which looks at moving a contact to a different lifecycle stage.
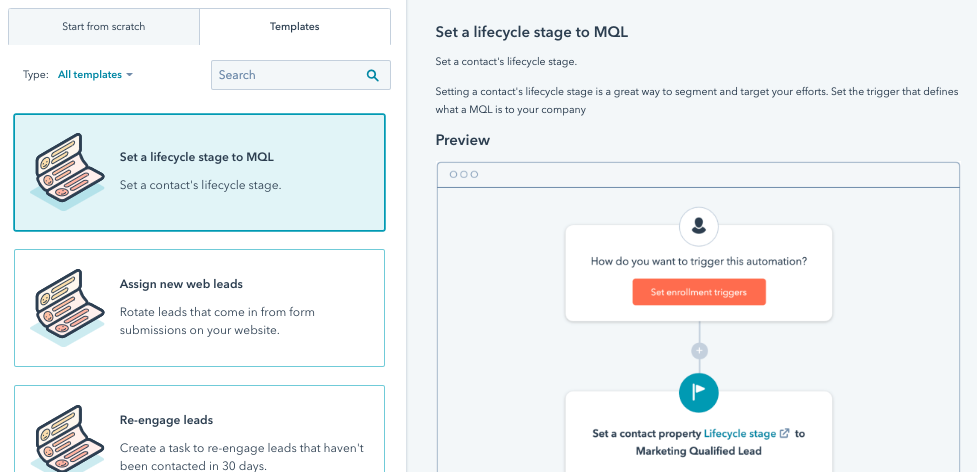
Move Contact to a new Lifecycle Stage
A contact-based workflow is what HubSpot defaults to when you select “template.” We are using information that someone gives to move them into different parts of the lifecycle. If you already have the buyer’s journey mapped out, this is where it comes into effect.
For example, if part of the selection process for your typical consumer would be to go to your website and download a case study, then that’s what we’ll select as a trigger. This part isn’t that tricky.
When you have someone download the case study, you will probably need to verify some sales information, or maybe needing more information to understand how good of a potential client this user might be.
Think of information that would be given up if you were really interested in a new product or service.
In our example, let’s say that up to this point, none of the information you’ve collected from this contact have been anything about income, even though it’s really important to understand for this customer before you know that they’re a great potential client or not.
To download the case study, they need to give up their income, and that gets them to a point where they’re a marketing qualified lead (MQL) and should be nurtured.
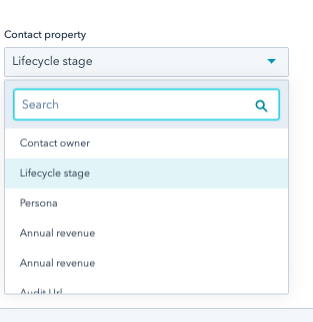
We first select which type of contact property we’re interested in sending out automatic processes when it’s triggered:

Second, make sure to select the matching criteria with the level of income they need. In our case, we know that once a potential consumer gives up personal information like their income, they’re likely to buy.
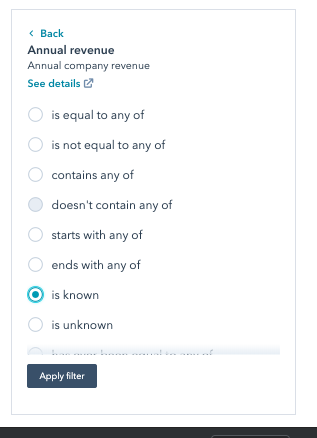
Save and apply the filter.
Next, are there other criteria that must be triggered to get them to the next lifecycle stage? Within the next window, you can add more depth to the analysis of moving them through the workflow.
For this example, we’ll keep it simple. Throughout your workflow, you’ll want to measure to understand which parts of the campaign need to do better.
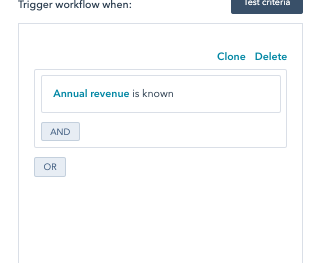
Save.
The next sequence in the contact-based workflow is just what lifecycle stage your company wants to put this potential client.
Select the second step in the process.
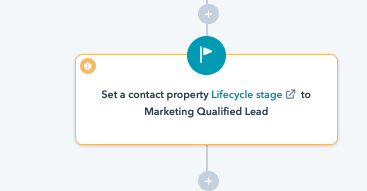
Your screen should look like this:
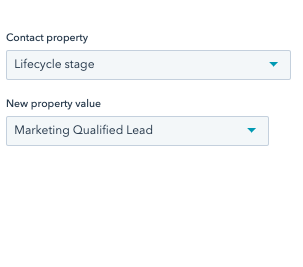
In our example, we’ve only been using contact properties, and we do want to figure out which works best. In our case, the lifecycle stage is what we’re looking for.
There are other options in the drop-down menu, but for this exercise, let’s keep it simple.
Select where they’re headed within the workflow, then save.
Assign New Web Leads
Depending on the culture of your sales team, you might have some pretty aggressive team members that are looking for the easy fruit at the bottom of the tree, or you might have a really great way of rotating sales between each member.
In the case of assigning new web leads to the sales team, we can trigger automation and rotate amongst your sales team, or other team members in order to qualify, nurture or close the lead.
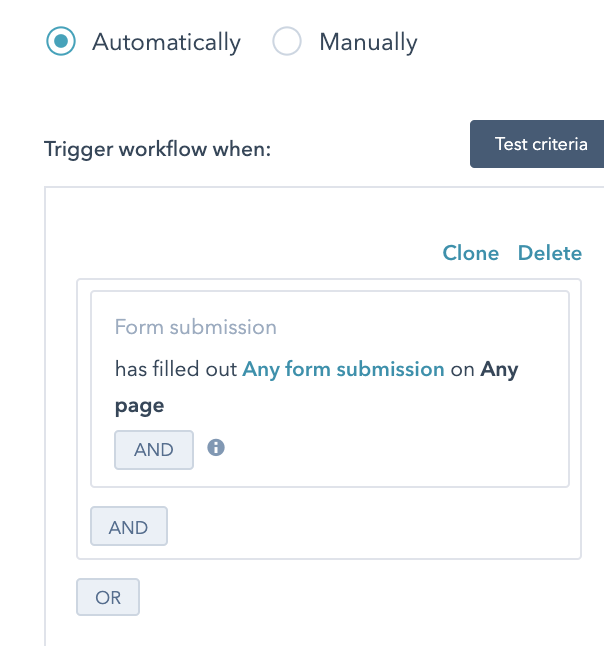
First, the incoming lead triggers by downloading a piece of content you have put together. If we follow the HubSpot inbound methodology funnel, an SQL (sales qualified lead) is going to come through a case study, ask for a proposal or an estimate, or reached out to inquire about the product.
The form submission defaults to “any download” of any piece of content, but you probably have several key pieces of content that you know potential clients are checking out before they’re ready for your sales team to contact them.
For instance, submitting their information onto a “Contact Us” form. You know that they’re ready to talk to someone regarding your product or service.
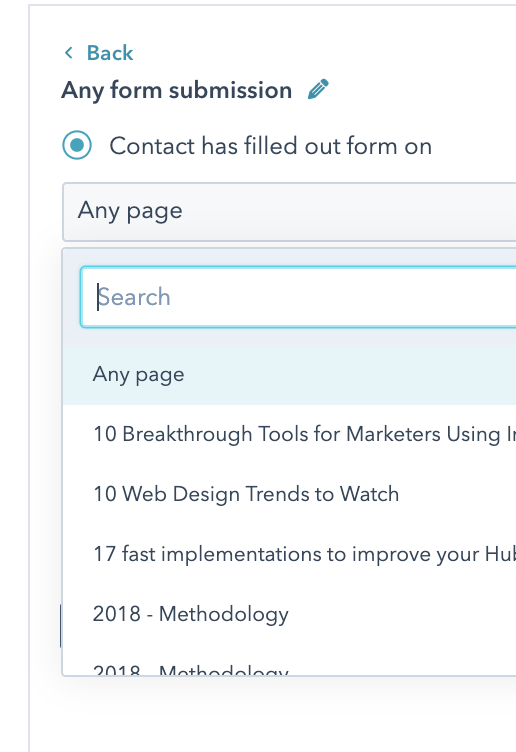
Click on the hyperlink “any form submission” to change to your contact us form.
Then assign a specific page that a contact needs to fill out a form on:
Once triggered, HubSpot can automatically assign them to members that you task within the next part of the workflow:
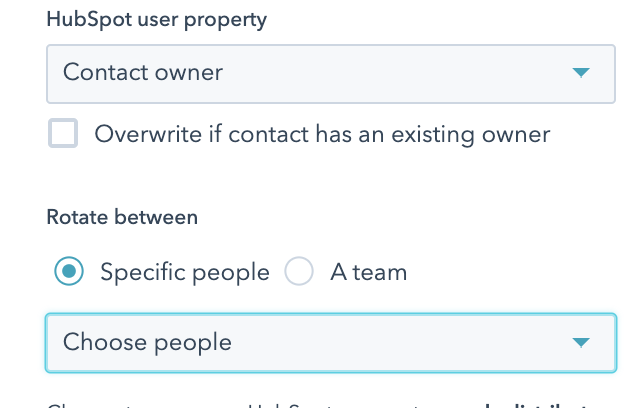
Utilize the text boxes within the “Choose People” drop-down box to select your sales team, and whom you’d like to rotate leads around to.
Re-engage Leads
Let’s face it, re-engagement of leads can be difficult if you have a ton coming in. Someone forgets to reach back out and see where they’re at, or somewhere, their information had fallen through a crack.
Maybe they just weren’t quite ready to make a decision the moment they were contacted.
That’s all right, and in order to re-engage the lead, we can automatically trigger a reminder to reach back out to them with this workflow.
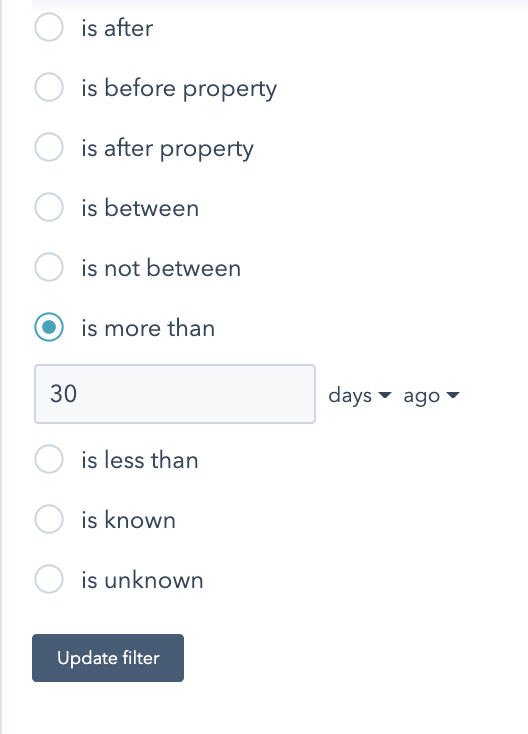
What we first need to understand is how long we should wait before reaching back out. 30 days? 50 days? 180 days? This will have a lot to do with the term of the total sales process. How long is the average lead time within your sales process?
If that information isn’t available, 30 days is a great way to start, and the company can readjust if pushback is high from the leads that you’re reaching back out to.
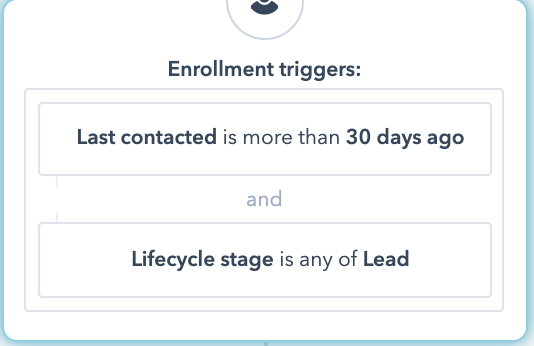
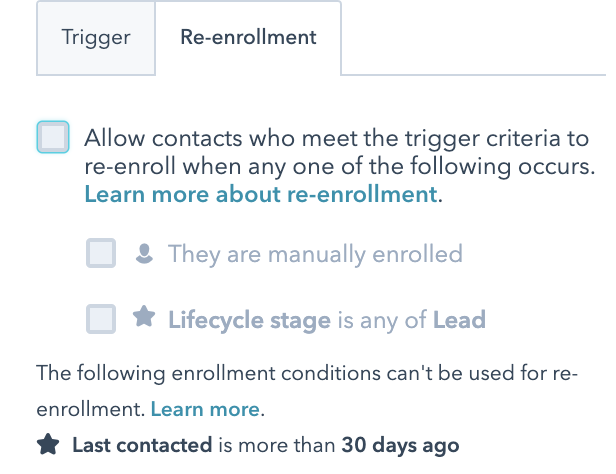
Within the enrollment tab, readjust to the amount of time that should elapse before reaching back out to the lead.
Or, you can re-enroll the lead back into another workflow.
Now for the task after enrollment into the workflow:
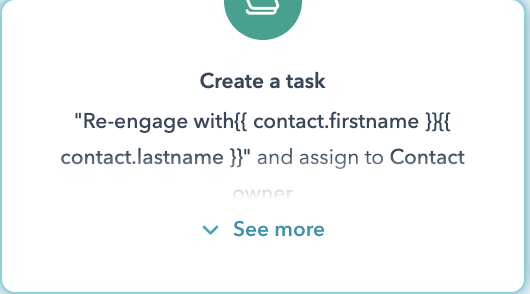
We’re going to send a reminder, either through email or an alert to the contact owner to reach out and re-engage the contact.
They can use the contacts database within HubSpot to see what the last touchpoint was, and go over notes to see how they can re-engage the contact.
Copy from Company to Contact
Have a new contact for a company you’re already working with? Could be a new project manager, another designer within the team, or something else.
Instead of having to add information within all the fields, and updating all the information you’d like to have from the project you’re working on, you can update it automatically.
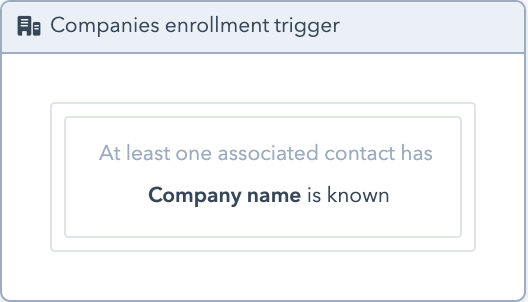
In this example, we’ll copy all information if the company name is known.
Go into the enrollment settings, and select Company Name is known.
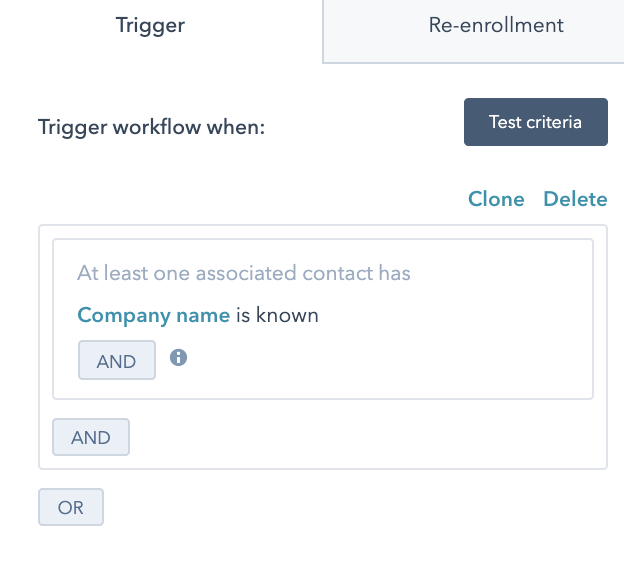
Then with each individual field that you’d like to fill, add a separate trigger:
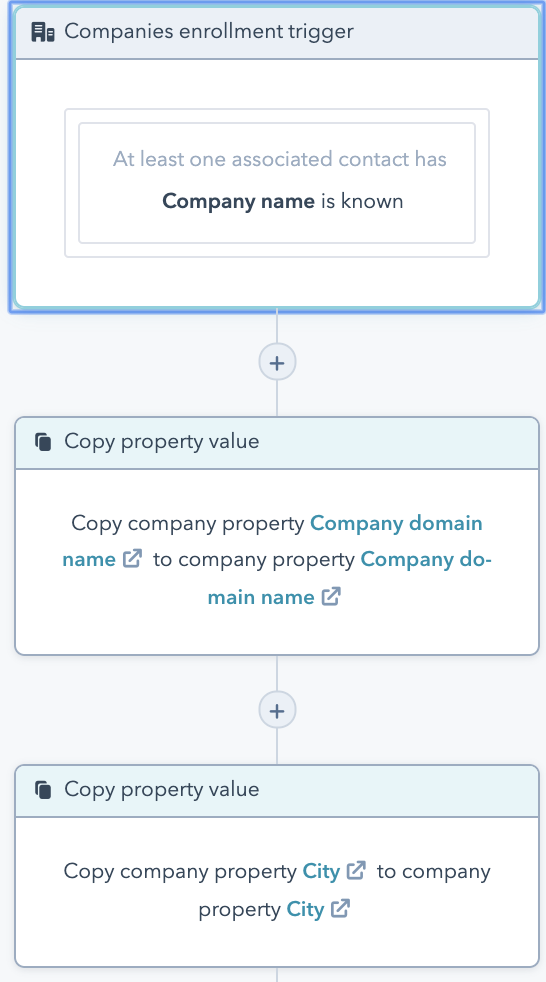
Creating each property value will be a little tedious, but if it’s tedious building just once, imagine all the time you’ll be saving in having to enter this information for each individual property!
Focus on High-Value Deals
You may have senior salespeople who are specifically tasked to close high-value deals, or you might just want to get an alert out to the sales team to focus on higher-value deals.
Whichever the reason, having this workflow on your side can help.
Set the enrollment trigger to the amount that typically conveys a high-value deal for you.
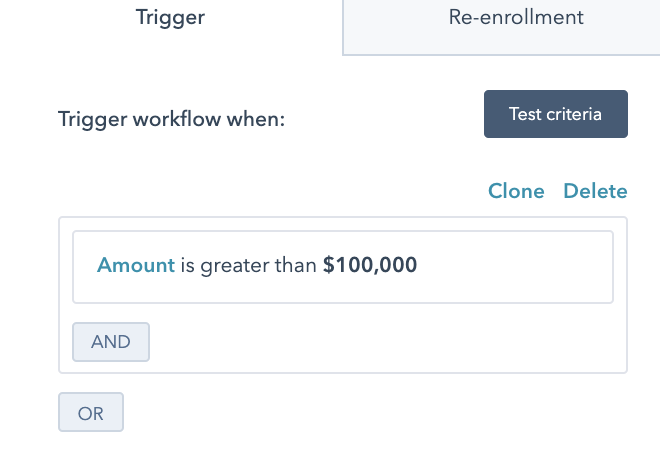
Then follow up within the trigger to assign the high value lead to someone who has the ability to close, or to the team that will be in charge of carrying out the responsibility.
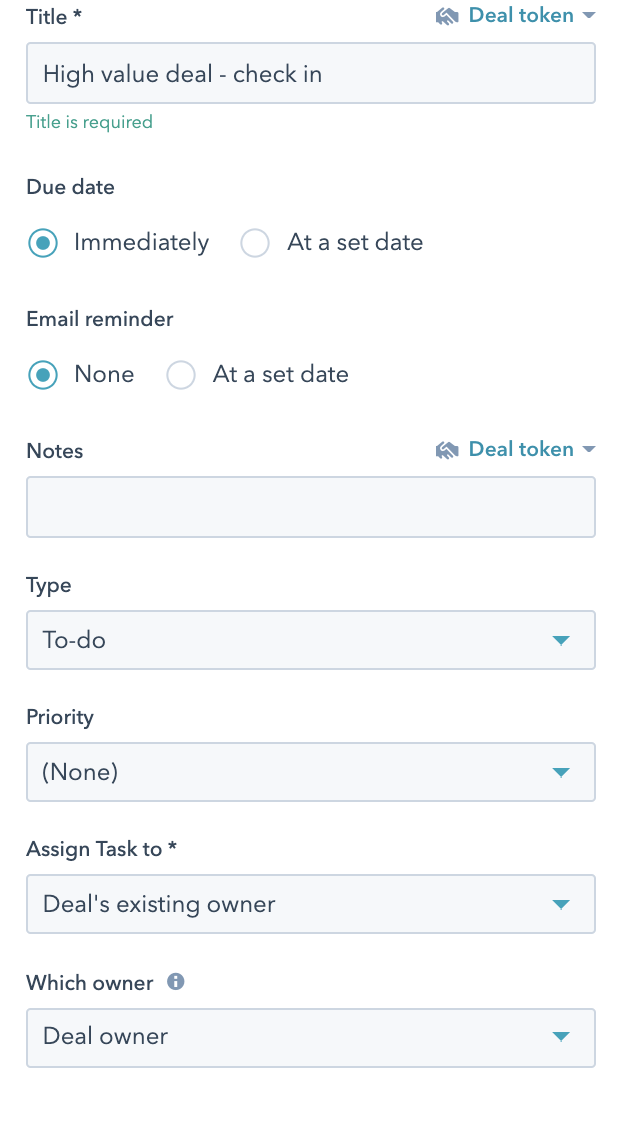
You can assign the type of alert they’ll be receiving, how high the priority level of the task is, or assign it to specific people.
Creating several workflows that capture low-, medium-, and high-level deals would be a great practice if leads are constantly coming in, and you want to maximize the effectiveness and revenue your team pursues.
Obviously, you could always hire more salespeople as well.
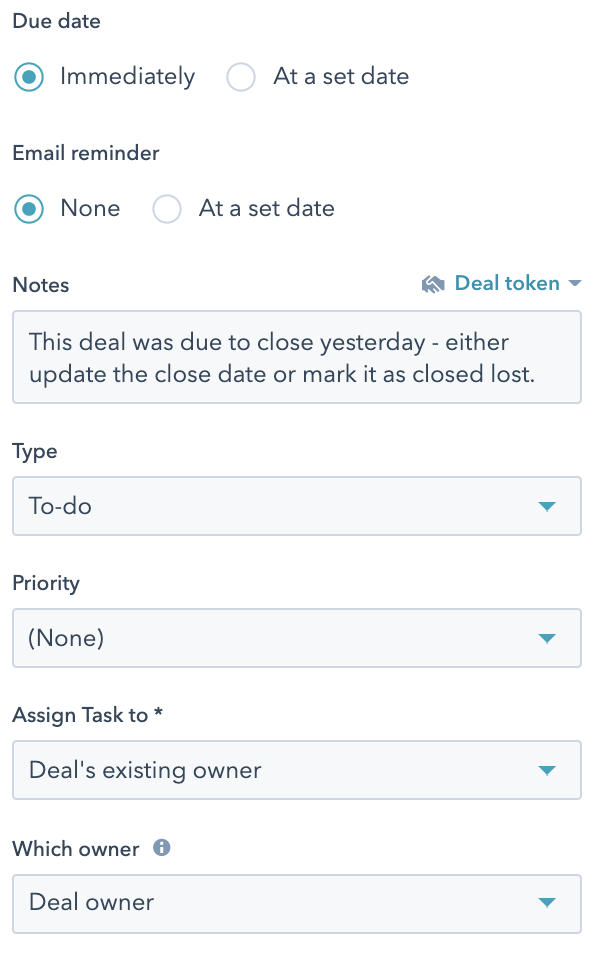
Reminder to Update Stale Deals
Have a bunch of deals sitting in the pipeline that you’ve been waiting for weeks to get signed? Chances are good these need someone to pull on the strings to see if the client is still interested.
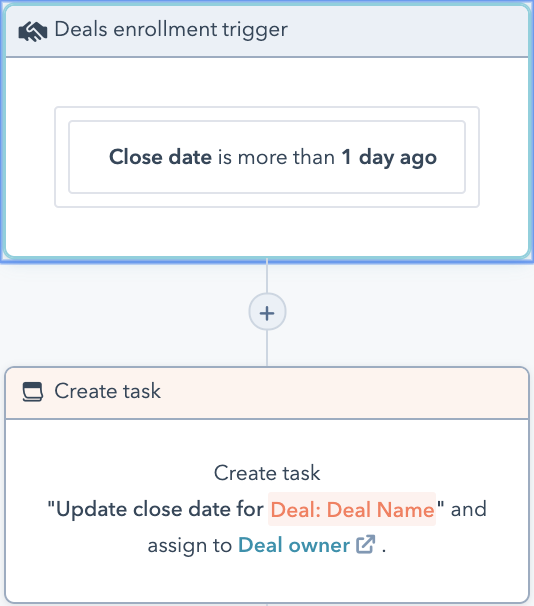
Assign someone from the sales team to either reach out and contact the client, or mark the deal as dead.
Not only will this get a better idea of what deals are on the table, it at least alerts the sales team to find out what deals are dead, as well as give them an opportunity to re-close the deal or even just to understand why the potential client didn’t sign.
Chapter 3: Types of workflows from scratch and why they work
Contact-based Workflows
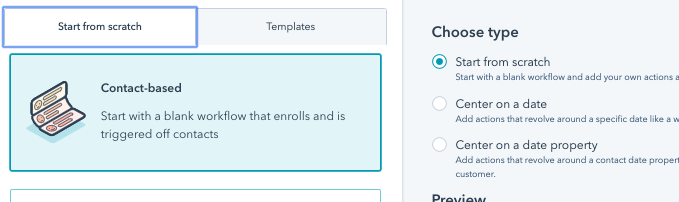
Granted, you can add to workflows built from a template, but these feel a little more like your own.
For example, if you’re holding a webinar, it can be advantageous to build your own template from scratch.
From there you can keep your own template and utilize it if you’re creating multiple webinars on multiple days, and would like to continue to reach out and nurture the contact.
In our case, let’s say that we have a webinar series we are opening once a week for a month. We can create one workflow and copy it for the entire month. We can even build in email blasts, or other triggers to see if people who have signed up for the webinars are interested in getting your product.
Let’s get designing:

Set your enrollment trigger. In our case, we’re going to use form submission, just because we expect to have a landing page built with a form to fill in order to get into the webinar.

Now here’s the series that we’d like to have:
- A thank you for submission
- 2-3 follow-up emails after the webinar to talk with a sales consultant from your company
- Re-enrollment into an informational workflow after they’ve finished this one to try and stay top-of-mind
We select our first email and implement it into the campaign.
The emails used within the workflows must be saved as an automated email. To learn how to do this, check out how to design and build an automatic email template.
Repeat the process for the next two emails. We should now have a welcome email, verifying the time of the webinar, along with two follow-up emails reminding them to check out the product.
You’ll notice that you have 3 emails on top of each other within the workflow now.
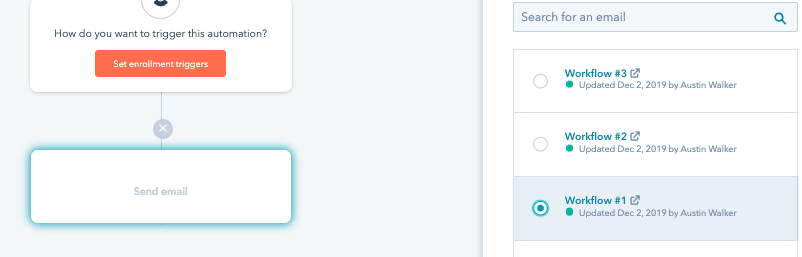
Let’s go ahead and add an enrollment into another workflow if the client reaches the end:
Look for it under the category “trigger.” Create the trigger and select a workflow they can be put into.
At this point, you’ve probably noticed that there have been no times or dates set in between each of the triggers. That’s correct!
In order to make sure that someone doesn’t receive all three emails at once, and is just automatically resubscribed into the other workflow, we have to add delays in between each automated response.
For this example, the welcome email is sent right when someone signs up for the webinar, and we added 3 hours’ delay, allowing for the webinar to finish, then follow-up asking the person what their thoughts are, and if they’d like to be contacted by a sales rep.
Lastly, the next two emails were sent 2 days apart, asking again if they wanted to be contacted.
Finally, at the end of the workflow, we have placed the contact into a workflow that sends information about our product and services intermittently to keep them posted and keep us top-of-mind.
Deals
Automating deals can be really powerful, especially when a potential customer has been through several different workflows, but can’t quite make the decision to make a purchase.
Deals can help offer additional incentives and add value to the client, as well as make a positive impact on your revenue over the long run.
Let’s say that a potential customer has now gone through our webinar series, spent several days thinking about purchasing your product or service but just isn’t quite able to make the purchase.
Let’s send them into a workflow of deals, along with triggers if they make the purchase so that they quite receiving the deal once they’ve made the purchase.
- Create a trigger after 14 days of no contact from the potential client
- Send email deals throughout two weeks with email discounts
- Kick them out of the workflow if they make a purchase
Let’s go into our workflow designer in HubSpot and create this from scratch:
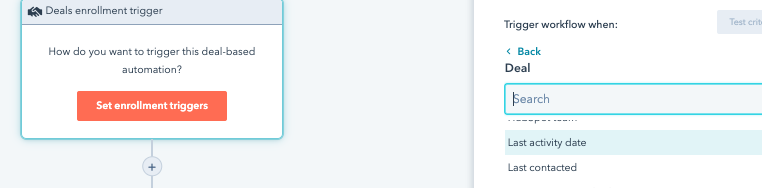
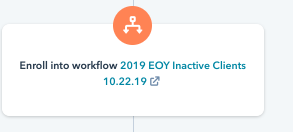
We’re going to create our trigger into the workflow from the potential client’s last activity date.
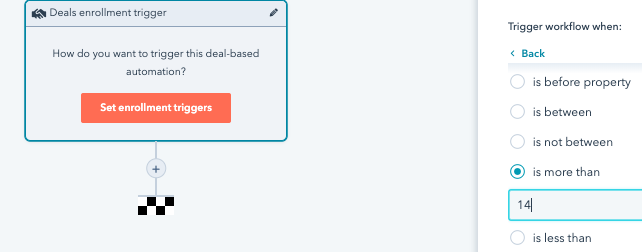
You can adjust accordingly, but we’re going to say after 14 days or two weeks of no activity on a deal, we’re going to start adding deals. This may be something that you should test after you have the workflow up and running.
After the first email, if the potential client actually converts, then we know the close date. Therefore, if we know the conversion date, we’ll kick them out of the workflow. If we don’t know the close date, we will keep pushing them through:
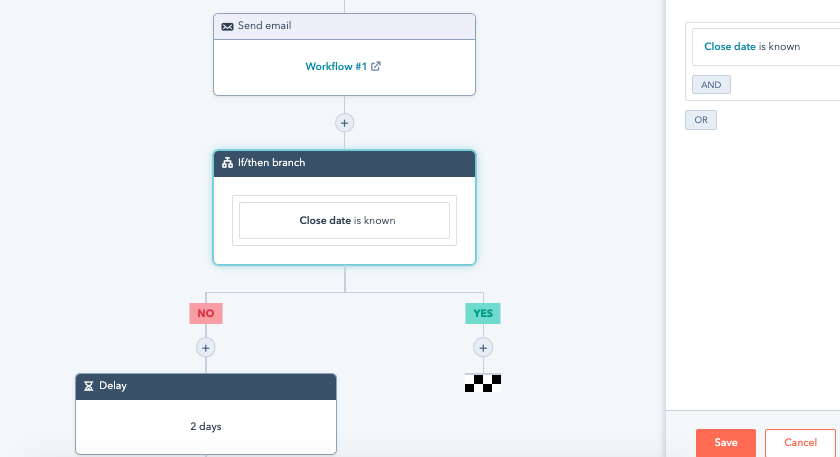
For the end of the workflow, we wait another couple of days and kick them out of the workflow. Having an and/then statement doesn’t make sense, as they can make either decision and won’t remain in the workflow.
Chapter 4: Improving the workflows with analytics
Analytics has become one of the most important parts for marketers and business owners alike to make sure that we are achieving objectives through our workflows and other marketing efforts.
In the case of workflows, KPIs are pretty easy to measure considering the fact that they can be built into a workflow.
Of course, we can pay attention to things like open rates, close rates, and engagement rates, but when it comes to which KPIs matter, it has to do with the goals of the workflow, and what it’s trying to accomplish.
For example, if we look back at our Lead to Marketing Qualified Lead workflow in Chapter 2, there aren’t a lot of points of data where we might utilize open rates or close rates.
Instead, our goal is to get people who have qualified to be a marketing lead into our funnels and into the nurturing hands of the marketing team.
So, we want to measure how many leads actually become marketing qualified leads.
Let’s set a goal:
Click on the Add a Goal tab.
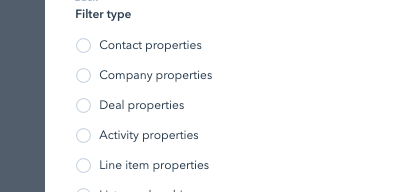
Select contact properties.
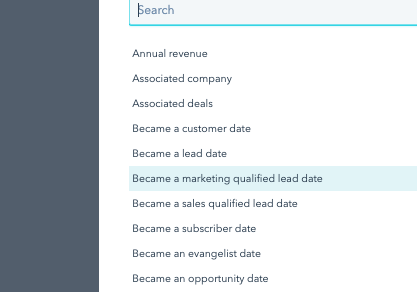
Select “Became a marketing qualified lead date.”
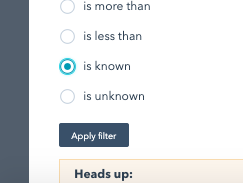
Click on “is known.” Then apply the filter.
This will create a known goal. If there is a known goal, once someone has reached it, they will automatically be removed from the workflow. This is great if we have a longer sales workflow, and don’t want to be sending additional deals or other things to people who have already made a purchase.
As the workflow begins to work, you can find the goal percentage within the “Performance” tab within the workflow editor, or you can navigate to the performance tab under analytics in your HubSpot portal as well.
Utilizing analytics within the workflows allows you to make decisions to understand if the workflow is increasing your business, increase the lead time, minimizing the amount of work your team has to do or is not working the way it should.
Make sure to implement goals with each one of your workflows to keep analysis quick and easy, as well as keep converted customers out of having to deal with emails or content that they no longer need.
Chapter 5: Conclusion
The workflow information provided within this ebook is meant to help you on your way to minimize how much time your team spends with repeatable tasks, decrease the amount of time spent on those tasks, and minimizing the amount of time a potential client spends in the sales cycle.
Implement workflows quickly, and use analytics to monitor them frequently. Simple adjustments may be the difference between a good year and a huge year.
Adding workflows in HubSpot is a great way to boost your marketing, but an unruly portal can problems and may potentially cause you to miss out on revenue. Check out 6 Workflow Ideas for Keeping Your HubSpot CRM Clean & Organized to help you maximize the benefits of your HubSpot workflows.

Pulling analytical data from the HubSpot platform is Austin's favorite pastime! He loves to see which pages are performing the worst and the best and continues to massage the elements for continual site improvements.

.png?width=500&height=500&name=Encourage%20the%20Decision%20Stage%20with%20CTA%20Buttons%20(2).png)